Tuesday, August 30, 2011

Pumpkin Cornbread


Is August too early to start baking with pumpkin? Maybe, but that's not stopping me...

The temperature was down in the 60's here the other day, making it really feel like Fall. All of a sudden the only thing I wanted to eat was a hot bowl of chili and some cornbread! As soon as I came across this recipe for pumpkin cornbread, that sealed the deal! The cornbread isn't overly pumpkin-y; it has just the right amount of pumpkin flavor hanging out in the background. It's perfect served with a drizzle of honey on top, alongside a bowl of chili!

Recipe: Adapted from SugarCrafter
Ingredients:
  • 1 cup flour
  • 1 Tbsp baking powder
  • 1 tsp kosher salt
  • 1/2 tsp ground cinnamon
  • 1/4 tsp ground nutmeg
  • 1/2 cup brown sugar
  • 1 cup cornmeal
  • 2 eggs
  • 1 cup pumpkin purée
  • 1/4 cup vegetable oil
  • 1/4 cup milk
  • 1 Tbsp honey
Directions:
  1. Preheat the oven to 400 degrees and grease an 8×8″ baking dish. In a medium bowl, whisk together the flour, baking powder, salt, spices, brown sugar, and cornmeal.
  2. In a small bowl, lightly beat the eggs, and then stir in the pumpkin, oil, milk and honey.
  3. Stir the wet ingredients into the dry ingredients just until combined, and then pour the batter into the pan, smoothing out the top as much as possible.
  4. Bake for 25-30 minutes or until a knife inserted in the center comes out clean.

Saturday, August 20, 2011

Mini Carrot Cake Cheesecakes


When I was conceptualizing this dessert in my head I asked myself "Are you really going to cheesecake and top it with a cream cheese frosting?" The answer: A resounding yes!

I don't know if I should be ashamed of this cream cheese on top of cream cheese concoction or proud of it, but I do know that I am very glad I made it! And so is everyone else who got to try it. Somehow I justified this cream cheese overload to myself because I'm pregnant, but let's be honest, once the idea was in my head there was no turning back, pregnant or not!

If you're asking yourself it the cream cheese icing is really necessary, or thinking about making the cheesecake without the icing, let me just stop you right now. The icing is crucial. I tried one plain without it, and it just tasted okay. It really lacked that carrot cake taste. The cream cheese icing on top really brings out that true carrot cake flavor and brings the whole dessert together.

I thought this dessert was great as it is, but next time I might try incorporating some toasted walnut or pecan into the crust. Or maybe decorate the top with a nut (instead of making Ross fish out all the orange sprinkles out of a bag of multi-colored sprinkles). Also, it should be noted that the recipe could easily be doubled. I didn't trust myself with that much cheesecake around, so I made a small(er) batch. I used my mini cheesecake pan and got about 14 mini cheesecakes. They went fast.

Mini Carrot Cake Cheesecakes
Ingredients:
  • 1 cup graham cracker crumbs
  • 4 tablespoons sugar
  • 4 tablespoons butter, melted
  • 8 0z cream cheese, softened
  • 1 egg, room temperature
  • 1/3 cup of sugar
  • 1 tablespoon flour
  • 1 tsp vanilla extract
  • 1 medium carrot, peeled and finely grated
  • 1/4 - 1/2 teaspoons cinnamon
  • 1/4 teaspoon nutmeg
  • 1/8 teaspoon ground ginger
  • 1/4 teaspoon salt
  • 4 oz cream cheese, softened
  • 2 tablespoons butter, softened
  • 2 cups powdered sugar
  • 1/2 tsp vanilla extract
  • 1/2 lemon extract (or a squeeze of lemon juice)
Directions:
  1. To make the crust: Preheat oven to 350°F. Spray mini cheesecake pans with non-stick spray, or line mini muffin tins with paper liners. Combine graham cracker crumbs, butter, and sugar. Press into pans (I used about 1 tablespoon per cheesecake). Bake for 10 - 12 minutes until golden brown.
  2. To make the cheesecake: Beat cream cheese and sugar with a mixer on medium speed until fluffy, about 4 minutes. Add the egg. Add carrots, flour, spices, and vanilla extract. Spoon on top of crusts so they are about 3/4 full.

  3. Bake until set, about 18 to 22 minutes.

  4. Transfer pans to a rack and let cool. Refrigerate until ready to frost.

  5. To Make Frosting: In a medium bowl, combine butter, cream cheese, confectioners' sugar and extracts. Beat until the mixture is smooth and creamy. Frost with cream cheese icing. Enjoy!

Saturday, August 13, 2011

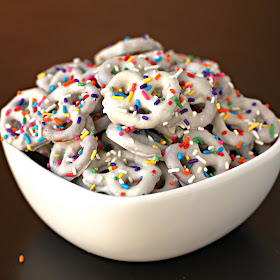
Chocolate Covered Pretzles & One in the Oven!


Well some of you may have noticed that my blog has slowed down considerably over the last few months. If there was ever a good excuse, this is it... I'm pregnant! Very pregnant as a matter of fact, my due date is in less than a month! Ross and I couldn't possibly be more excited. This is our first baby and somehow time seems to be standing still and going in fast forward all at once.

I didn't plan on blogging so infrequently while I was pregnant, but it just kind of got away from me. It started with the first trimester nausea where I couldn't stomach the thought of being in the kitchen cooking. Then I took a few trips that had me out of town and away from my kitchen for awhile. And then I just kind of lost my baking mojo. I didn't seem to have the energy to bake, and when I did, I seemed to always forget to take pictures.

Now, with my due date quickly approaching, I seem to have my mojo back. I'm realizing that in one month I probably won't have the freedom (or energy) to whip up a back of cookies on a whim just because I feel like it. This has me taking advantage of what time I have left and all of sudden I have a long list of things I can't wait to make (and blog about)! I know I should probably be focused on making some freezer meals for after the baby is here, but I just can't help making a few sweet treats too.

These pretzels are an homage to my pregnancy. I didn't have any weird pregnancy cravings like pickles and ice cream, and I never sent Ross out in the middle of the night for something I just had to have, but I did develop a slight obsession with pretzels. It started in my first trimester when I was nauseous all the time; the only thing I seemed to want to eat was pretzels. I think I've consumed more pretzels in the past 8 months than I have in my entire life. I think it's something about the saltiness that really does it for me. And these chocolate covered pretzels, well they're just about perfection my eyes! The salty and the sweet are perfect together and the colorful sprinkles just make me happy!

Chocolate Covered Pretzels
Ingredients:
  • Mini Pretzels
  • 1 lb chocolate (any kind will do) or candy melts
  • Sprinkles (optional)
Directions:
  1. Melt the chocolate in a microwave or a double boiler.
  2. Dip the pretzels in the chocolate. I did this buy submerging the pretzels in the chocolate and then fishing it out with a fork. I would tap the fork against the side of the bowl to let any excess chocolate drip off.
  3. Place the pretzels on a baking sheet lined with wax paper.
  4. Apply sprinkles before the chocolate hardens.