Wednesday, June 30, 2010

Chocolate Chip Meringue Cookies


Are you ready for the easiest cookie recipe ever? This is it. I feel silly looking back at all the times I've thrown away egg whites when the recipe calls for just yolks. Knowing how easy it is to make meringues pretty much guarantees that no egg white will go unused again!

I'm not gonna go so far as to call this a healthy cookie because there a decent amount of sugar in these, but as far as cookies go these are definitely on the healthy end of the spectrum. They are essentially fat free. No butter, no oil, no egg yolks. Just egg whites and sugar.

If you've never had a meringue before they are hard to explain. The exterior is crackly and crispy but the inside is so light and airy. I love the way it practically dissolves in your mouth when you take a bite.

A few notes about the recipe:
  1. Make sure your egg white are at room temperature. Separate them when they are cold, then let the egg whites sit for about 30 minutes at room temperature.
  2. Temperature. I saw some recipes that said to cook at 200 degrees for a long period of time (1.5 - 2 hours) and some recipes that said to cook at 300 degrees for a shorter period of time. I went right in the middle. I cooked them at 250 for about an hour. Then I turned off the oven and let them sit in the oven for about another hour.
  3. Working with egg whites. Make sure your bowl is very clean and dry, otherwise you will never get your whites to stiffen.
  4. Sugar. The recipe calls for extra fine sugar. I used regular sugar and pulsed it in the food processor for about 30 seconds. Don't overdo it though, you don't want powder.
  5. Chocolate. I used mini chocolate chips and I took a knife to about 1/3 of them and chopped them really really finely. This gave the cookies more a of a speckled look which I liked.
Chocolate Chip Meringues
Recipe: Inspired from SmittenKitchen
Ingredients:
  • 3 egg whites room temperature
  • Pinch of salt
  • 1/8 teaspoon of cream of tartar
  • 1 teaspoon vanilla
  • 3/4 cups of superfine sugar
  • 6 oz mini chocolate chips
Directions:
  1. Preheat oven to 200°F.

  2. Beat egg whites until foamy. Add salt, cream of tartar and vanilla, and beat mixture again until it holds soft peaks.

  3. Add the sugar, gradually, beating the batter until it is stiff.

  4. Fold in the chocolate chips. Spoon batter onto parchment paper-lined baking sheets (or pipe the batter if you want). Bake for 1 hour, rotating the pans half way through cooking. After 1 hour, turn off the oven. Let the meringues sit in the oven for 1 - 2 hours.

Thursday, June 24, 2010

Blueberry Muffins with a No Fail Streusel Topping


I've been searching for the perfect blueberry muffin recipe for a while now. I've tried countless recipes on the internet and I've come really close a few times but there was always something off about each recipe I tried. Too dry, too dense, too flavorless, too sweet, not sweet enough. I finally turned to a cookbook that I've had on the shelf for a few years (shocking, I know) and there it was...when I was least expecting it, I found it, the perfect blueberry muffin.

This muffin uses buttermilk and lemon zest to add to the flavor. It is light and perfectly sweet and tastes exactly like a blueberry muffin should. And the streusel on top is just perfect. If you're looking for a recipe to use up some blueberries give this one a try... you won't be disappointed!

Blueberry Buttermilk Muffins with Streusel Topping (Makes 14 Muffins)
Recipe: Adapted from "Great Coffee Cakes, Sticky Buns, Muffins, & More"
Ingredients:
  • 1 recipe of streusel topping (recipe follows)
  • 1 3/4 cups all purpose flour, spooned in and leveled
  • 1/2 tsp baking powder
  • 1/2 tsp salt
  • 1/4 tsp baking soda
  • 2/3 cup (1 1/3 sticks) unsalted butter, slightly firm
  • 2 tsp finely grated lemon zest
  • 3/4 cup sugar
  • 1 large egg
  • 1 tsp vanilla extract
  • 1/2 cup buttermilk
  • 1 1/2 cups fresh blueberries
Directions:
  1. Prepare the struesel topping (recipe follows).
  2. Position racks in the upper and lower thirds of the oven. Heat teh oven to 375 F. Line fourteen muffin cups with paper or foil cupcake liners.
  3. In a large bowl, thoroughly whisk together the flour, baking powder, salt, and baking soda. Set aside.
  4. Cut the butter into 1-inch pieces and place in the bowl of an electric mixer fitted with the paddle attachment. Add the lemon zest and mix on medium speed until smooth and lightened in color, about 1 minute. Add the sugar in a steady stream, then blend in the egg and vanilla, scraping down the side of the bowl as needed.
  5. Reduce the mixer speed to low and add the flour mixture alternately with the buttermilk, dividing the flour into three parts and the buttermilk into two, starting and ending with the flour. mix just until blended after each addition.
  6. Gently fold in half of the blueberries.
  7. Fill each cup about 2/3 full. Place a layer of blueberries evenly over the batter, then place a dollop of batter on top of the blueberries. it's okay for the berries to show. Take a handful of the streusel topping and crumble it over the batter and berries completely covering the tops of the muffins with the crumbs. Press gently to adhere. Brush any stray crumbs from the top of the muffin pans using a small pastry brush.
  8. Bake for 25 to 30 minutes, or until the streusel topping is golden brown. To ensure even baking, towards the end of baking time, rotate the pans top to bottom and front to back. Remove from the oven and place on a rack to cool.
Struesel Topping
Recipe from: "Great Coffee Cakes, Sticky Buns, Muffins, & More"
Ingredients:
  • 6 - 7 tbls unsalted butter (See note)
  • 1 cup all purpose flour, spooned in and leveled
  • 1/2 cup sugar
  • 1/2 tsp cinnamon
  • 1/4 tsp baking powder
  • 1/4 tsp salt
  • 3 tbls finely chopped walnuts or pecans (optional)
Directions:
  1. Place the butter in a 2 qt heavy bottomed saucepan and heat until almost melted; remove from heat and cool to tepid.
  2. Whisk together the flour, sugar, cinnamon, baking powder, salt, and nuts (if using). Add to the butter and stir with a fork until blended and mixture begins to form crumbs. Gently squeeze the mixture with your hand to form larger lumps, then break them apart with your fingertips. Before using, let the streusel stand for 10 to 15 minutes.
Note: Start with 6 tablespoons of butter. If the crumb mixture appears to be too dry or too crumbly add a bit more butter. If the mixture requires additional butter, push some of the crumbs aside and place the butter in the cleared spot. Place the saucepan on low heat, positioning it so that the butter is over the heat.

Wednesday, June 23, 2010

Tomato, Corn, Avocado Salsa


I'll pretty much eat anything if it has tomato and avocado in it. Now that it's summer and tomatoes are flavorful, plentiful, and cheap I find myself making salsas all the time. This is one of my favorite because it screams summer!
'
So what do I do with this salsa? Pretty much everything. I've thrown it on top of grilled mahi mahi. I've served it as an appetizer with some blue corn tortilla chips. Last night I served it with black bean quesadillas. And more often than not, I just eat it with a spoon.

The recipe is more of a guideline than a recipe. Feel free to add more jalepeno and onion if you want more heat. My only note: Don't be shy with the salt. All of the ingredients really need it to help their flavor come through.


Corn Tomato Avocado Salsa Recipe
Ingredients:
  • 1 1/2 cups of diced tomato (I used about 4 roma tomatoes)
  • 1 avocado, diced
  • 1 cup of corn (canned, fresh, or frozen)
  • 1/4 of a small red onion, finely diced
  • 1/2 of a jalepeno, seeded and diced
  • Juice of 1 lime
  • 1 tsp extra virgin olive oil
  • 1 tbls chopped cilantro
  • Salt and pepper to taste

Sunday, June 20, 2010

Healthy Zucchini Apple Muffins


After posting about blueberry cheesecake ice cream and smores brownies, I figured I should make something a little healthier. I had some zucchini and apples that I needed to use up so I threw them into a healthy muffin recipe not really sure what to expect. I had 2 zucchini and 2 apples. I couldn't decide if I wanted to grate the apples or dice them, so I grated one and diced the other. I really liked the bites of diced apple running through the muffin. These came out great and I'll definitely be making them again!

This was my first time making a "healthy" muffin, so I still used a little real sugar and real oil. I think next time I make them I would cut the sugar out completely and just use a little more agave or honey. I definitely recommend keeping the walnuts in the recipe. I'm not usually a fan of nuts in muffins, cookies, or brownies, but in this case the walnuts added a really nice texture to the muffin.

Zucchini Apple Muffins
Recipe: Makes about 16 muffins
Ingredients:
  • 1 cup whole wheat flour
  • 1 cup AP flour
  • 2 cups grated zucchini (squeezed, then packed into a measuring cup) [about 2 medium zucchini]
  • 1 apple, peeled and grated
  • 1 apple, peeled and diced
  • 1 egg
  • 1 egg white
  • 1/3 cup sugar
  • 1/4 agave or honey
  • 1 teaspoon vanilla extract
  • 1/3 cup of unsweetened applesauce
  • 3 tbls canola oil
  • 1 1/2 tsp baking soda
  • 1 heaping teaspoon cinnamon
  • 1/4 teaspoon nutmeg
  • pinch of salt
  • 1/2 cup chopped walnuts
Directions:
  1. Preheat oven to 350F and line muffin cups with paper liners. Grate zucchini by hand or using a food processor, then gently squeeze grated zucchini to remove some of the water.
  2. In a medium-sized bowl, beat egg, egg white, then add vanilla, sugar, and agave nectar and mix to combine. Stir in the grated zucchini, and apple then the oil and applesauce.
  3. In a smaller bowl, combine AP flour, whole wheat flour, cinnamon, nutmeg, baking soda, and salt. Stir dry ingredients into the zucchini mixture, then fold in chopped walnuts and apples.
  4. Bake for 25-30 minutes, or until a toothpick inserted into the center comes out clean. Let muffins cool a few minutes in the muffin tin or cups, then remove and cool a few minutes more.

Thursday, June 17, 2010

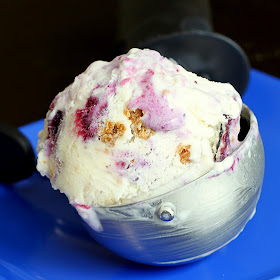
Blueberry Cheesecake Ice Cream


Blueberries, cheesecake, and ice cream. Those are pretty much 3 of my favorite things, so naturally I absolutely loved this ice cream. Ross declared it the best ice cream that I've ever made (but to be fair he says that every time I make a new ice cream flavor).

I definitely had my doubts about this recipe. It uses no eggs and gets it cheesecake flavor from a packet of instant cheesecake flavored jello pudding. There is no actual cream cheese in this recipe, but if you tasted it, you wouldn't know. It came out amazing. It was creamy and rich and indulgent, the way ice cream should be!

A couple notes about the recipe:
  1. It makes A LOT of ice cream. You may have to freeze the mixture in 2 batches depending on the size of your ice cream maker.
  2. I used 2% milk for the ice cream and it was fine.
  3. If you wanted to save time you could buy a premade graham cracker crust and crumble that into the ice cream instead of making the graham cracker crust yourself.

Recipe: Blueberry Cheesecake Ice Cream
Adapted from: AllRecipes.com

Blueberry Mixture:
  • 1/2 cup sugar
  • 1 tablespoon cornstarch
  • 1/2 cup water
  • 1 1/4 cups fresh or frozen blueberries
  • 1 tablespoon lemon juice

Graham Cracker Mixture:
  • 2 1/4 cups graham cracker crumbs
  • 2 tablespoons sugar
  • 1/2 teaspoon ground cinnamon
  • 1/2 cup butter, melted

Ice Cream:
  • 1 1/2 cups sugar
  • 1 (3.4 ounce) package instant cheesecake or vanilla pudding mix
  • 1 quart heavy whipping cream
  • 2 cups milk (I used 2%)
  • 2 teaspoons vanilla extract

Directions:
  1. In a small saucepan, combine sugar and cornstarch. Gradually stir in water until smooth. Stir in blueberries and lemon juice. Bring to a boil. Reduce heat; simmer, uncovered, for 5 minutes or until slightly thickened, stirring occasionally. Cover and refrigerate until chilled.
  2. In a large bowl, combine the cracker crumbs, sugar and cinnamon. Stir in butter. Pat into an ungreased 15-in. x 10-in.x 1-in. baking pan. Bake at 350 degrees F for 10-15 minutes or until lightly browned. Cool completely on a wire rack.
  3. In a large bowl, whisk the ice cream ingredients. Fill ice cream freezer cylinder two-thirds full; freeze according to manufacturer's directions. Refrigerate remaining mixture until ready to freeze. Whisk before adding to ice cream freezer (mixture will have some lumps).
  4. Crumble the graham cracker mixture. In a large container, layer the ice cream, graham cracker mixture and blueberry sauce three times; swirl. Freeze.

Saturday, June 12, 2010

Smores Brownies


I am clearly developing an obsession with smores. First there was smores bars, then smores cookies, and now smores brownies! And you know what? These are my favorite...hands down!

If you're looking for a dessert to bring to some bbqs this summer, look no further. This will definitely be a crowd pleaser.

I don't really know what else to say about these except that they are insanely delicious! It's the Baked Brownie, plus graham cracker, plus marshmallow. I'm beginning to think you can addgraham cracker and marshmallow to any dessert and it will only make it better.


Smores Brownies
Recipe: Idea from Joy the Baker
Ingredients:
  • 1 batch of Baked Brownie batter (or your favorite brownie recipe)
  • 1 cup graham crackers, roughly crushed with your hands
  • 12 big marshmallwos
Directions:
  1. Preheat oven to 350. Grease a 9 x 13 baking dish.
  2. Prepare brownie batter.
  3. Mix in graham crackers
  4. Pour into prepared baking dish and dot with 12 big marshmallows.
  5. Bake for 30 - 35 minutes.
  6. Marshmallows will be browned and puffy but will deflate as the brownies cool. Cool for at least 20 minutes than slice with a sharp knife, cleaning the knife with hot water if it gets too messy and sticky.

Wednesday, June 9, 2010

Snickerdoodle Cupcakes with Cinnamon Cream Cheese Frosting (and My Blogiversary!)


Today marks 1 year since I started SugarCooking and what better way to celebrate than with cupcakes! Cupcakes seem to be my answer for everything. Birthday coming up? I'll make cupcakes! Barbeque this week? I'll make cupcakes! Going to a friends for dinner? I'll make cupcakes! Who had a heart attack? I'll make cupcakes!

These cupcakes were great. The batter was light and moist and it wasn't overly sweet. It tasted exactly like you would expect it to, like a snickerdoodle cookie in cupcake form. The recipe comes from Martha Stewart, and she recommended using her Seven Minute Frosting, but I thought a cinnamon cream cheese frosting would be better. And it was. I guess that's not really a fair statement since I've never tried the seven minute frosting, but I seriously cannot imagine anything tasting better than this frosting!

As part of my blogiversary celebration post, I'm posting my top 10 favorite posts from the last year. It was hard to narrow it down but here they are...


1. Oreo Cookie Cookies


2. Cappuccino Brownies


3. Smores Bars


4. Nutella Cookies


5. Brown Butter Chocolate Chip Cookies


6. Smores Cookies


7. Key Lime Pie Ice Cream


8. Black & Tans (Like Black & White Cookies, but with peanut butter!)


9. Chocolate Chip Cookie Dough Cupcakes


10. Chocolate Malt Cupcakes

Snickerdoodle Cupcakes
Recipe: Adapted from Martha Stewart, makes 14 cupcakes
Ingredients:
  • 3/4 cups all-purpose flour
  • 3/4 cups cake flour (not self- rising), sifted
  • 1/2 tablespoon baking powder
  • 1/4 teaspoon salt
  • 1/2 tablespoon ground cinnamon, plus 1/2 teaspoon for dusting
  • 1/2 cup (1 sticks) unsalted butter, room temperature
  • 1 cups sugar, plus 2 tablespoons for dusting
  • 2 large eggs, room temperature
  • 1 teaspoons pure vanilla extract
  • 3/4 cups milk
Directions:
  1. Preheat oven to 350 degrees. Line standard muffin tins with paper liners. Sift together both flours, baking powder, salt, and 1/2 tablespoon cinnamon.
  2. With an electric mixer on medium-high speed, cream butter and sugar until pale and fluffy. Add eggs, one at a time, beating until each is incorporated, scraping down sides of bowl as needed. Beat in vanilla. Reduce speed to low. Add flour mixture in three batches, alternating with two additions of milk, and beating until combined after each.
  3. Divide batter evenly among lined cups, filling each three-quarters full. Bake, rotating tins halfway through, until a cake tester inserted in centers comes out clean, about 20 minutes. Transfer tins to wire racks to cool completely before removing cupcakes. Cupcakes can be stored up to 2 days at room temperature, or frozen up to 2 months, in airtight containers.
  4. To finish, combine remaining 1/2 teaspoon cinnamon and 2 tablespoons sugar. Pipe frosting on each cupcake. Using a small, fine sieve, dust peaks with cinnamon-sugar. Cupcakes are best eaten the day they are frosted; keep at room temperature until ready to serve.

Cinnamon Cream Cheese Frosting
Ingredients:
  • 8 oz cream cheese, softened
  • 1 stick of butter, softened
  • 1/2 tsp cinnamon
  • 1 tsp vanilla extract
  • 3 - 4 cups powdered sugar
Directions:
  1. In a medium bowl, combine butter and cream cheese. Beat until the mixture is smooth and creamy.
  2. Add the cinnamon, vanilla extract, and powdered sugar (1 cup at a time). Beat until smooth and creamy.

Friday, June 4, 2010

Asian Turkey Burgers with Hoisin Mayo


Turkey burgers are one of my favorite things to make during the week. They're quick, easy, healthy, and make great leftovers the next day for lunch. I'm always looking for new flavor combinations and this asian style burger just replaced the greek style burger as our new favorite.

The burger gets most of its Asian flavor from grated ginger, grated garlic, and hoisin sauce added to the meat. It was also one of the most moist turkey burgers I've ever eaten. These burgers are great plain since they have so much flavor. Just add a drop of hoisin mayo and they're perfect!

Asian Turkey Burgers
Recipe: Adapted from Eating Well
Ingredients:
  • 1.3 lbs of ground turkey (I used 93/7, but I think turkey breast would be fine too)
  • 1/4 cup whole wheat breadcrumbs
  • 1 egg
  • 2 tablespoons hoisin sauce
  • 2 scallions, trimmed and sliced
  • 1 tablespoon grated fresh ginger
  • 2 cloves garlic, grated
  • Salt & Pepper to Taste
  • Hoisin Mayo (Recipe Follows)
Directions:
  1. Combine the first 7 ingredients and mix well. Form the mixture into patties. (I made mine smaller than normal burgers and got 6 burgers. You should be able to get 4 - 5 regular sized burgers).
  2. Sprinkle the patties with salt and pepper.
  3. Heat grill or grill pan to medium high. Oil the grill and grill until browned and no longer pink in the center, about 5 - 7 minutes per side.

Hoisin Mayo
Ingredients:
  • 1/2 cup mayonaise (I used light)
  • 1 tablespoon hoisin sauce
  • dash of sesame oil
  • salt and pepper to taste
Directions:
  1. Combine all ingredients and mix well.

Thursday, June 3, 2010

Grilled Corn Salad


The other day I went to the store and fresh corn was on sale. It was 10 ears of corn for $2! Clearly, I had to buy some corn. I had no idea what I was going to make with it, but I knew I'd figure something out. And I did. And it was so good, I went back to the store 2 days later so buy even more corn and make the same dish again. Yes, you read that right. I might this corn twice in 2 days!

The recipe is pretty simple, but requires a little time and labor. This was my first experience grilling corn, so I read a lot of different methods before beginning. It seems like the preferred method is to keep the husks on, remove the silks, soak in water for about 30 minutes, then grill for about 20 minutes. That's exactly what I did and they came out so good!

I took bits and pieces from different corn recipes I saw and ended up with this. Some recipes call for mayo, sour cream, or creme fresh to be mixed in with the corn but I wanted the freshness of the corn to stand out so I just used a tiny bit of butter. The recipe calls for cotija cheese and I definitely encourage you to seek it out instead of replacing it because it really takes the corn to a whole new level!

Grilled Corn Salad with Cotija Cheese
Ingredients
  • 8 - 10 ears of corn, silks removed, husks on (soaked in water for 30 min)
  • 1/2 tbls butter
  • Juice of 1 lime
  • 1 tbls chopped, fresh cilantro
  • 1/2 cup cotija cheese, crumbled
  • 1 tsp salt
  • 1/2 tsp chili powder
  • 1/8 tsp ancho chili pepper (I'm a wimp with spice, add more if you want)
Directions:
  1. After soaking the corn, grill on medium high for about 20 minutes.
  2. When the corn is cool enough to handle, remove the husks and cut the corn off the cob.
  3. Saute in a pan over medium high heat with the butter, lime juice, cilantro, salt, pepper, chili powder, and chili pepper.
  4. Add the cotija cheese just before you are ready to serve.

Tuesday, June 1, 2010

Banana Bars 2 Ways: Peanut Cream Cheese Frosting & Vanilla Cream Cheese Frosting


I'm always looking for new ways to use up extra bananas. Don't get me wrong, I love banana bread, but I was looking for something a little different this time around. These frosted banana bars did not disappoint!


I couldn't decide between regular cream cheese frosting or a peanut butter cream cheese frosting. So what's a girl do to? Make both of course! Which one was my favorite? Well whichever one I was eating at the moment. Seriously, both frostings were amazing. The peanut butter cream cheese far exceeded by expectations. I wasn't sure how peanut and cream cheese would go together, but holy cow this stuff is incredible!

Ross preferred the peanut butter one hands down, but that's no surprise because he loves anything peanut butter. His first reaction when he tried a bite was, "Wow. You should put this frosting on more stuff!" (What he really meant is that I should make something chocolate and put it on that, because according to Ross while banana + pb is good, chocolate + pb is unbeatable).

The original recipe calls for a 10 x 15 jellyroll pan, but I divided the batter into two 8 x 8 pans. You could also make these in a 9 x 13 pan. Whatever you chose, cut them into small pieces but the icing is some sweet stuff!

Frosted Banana Bars
Recipe: Adapted from AllRecipes.com
Ingredients:
  • 1/2 cup butter, softened
  • 1 cups white sugar
  • 1/4 cup of brown sugar (increase to 1/2 cup if you like it sweeter)
  • 2 eggs
  • 1 cup sour cream
  • 1 teaspoon vanilla extract
  • 2 cups all-purpose flour
  • 1 teaspoon baking soda
  • 1/4 teaspoon salt
  • 1 cup mashed ripe bananas (about 2-3 bananas)
Directions:
  1. Preheat oven to 350 degrees F (175 degrees C). Grease a 10x15 inch jellyroll pan (or 9x13, or two 8x8's).
  2. In a large bowl, cream together the butter and sugar until smooth. Beat in the eggs, one at a time, then stir in the sour cream and vanilla. Combine the flour, baking soda and salt; stir into the batter. Finally, mix in the mashed banana. Spread evenly into the prepared pan.
  3. Bake for 25 - 30 minutes in the preheated oven, until a toothpick inserted into the center comes out clean. Allow bars to cool completely before frosting.

Peanut Butter Cream Cheese Frosting (Enough for an 8 x 8 pan, double for 9 x 13)
Recipe: Adapted from SmittenKitchen
  • 5 ounces cream cheese, at room temperature
  • 1/2 stick (2 ounces) unsalted butter, at room temperature
  • 2 - 3 cups confectioners’ sugar, sifted
  • 1/3 - 1/2 cup smooth peanut butter, preferably a commercial brand (because oil doesn’t separate out)

Directions:

  1. In a large bowl with an electric mixer, beat the cream cheese and butter until light and fluffy. Gradually add the confectioners’ sugar 1 cup at a time, mixing thoroughly after each addition and scraping down the sides of the bowl often. Continue to beat on medium speed until light and fluffy, 3 to 4 minutes
  2. Add the peanut butter and beat until thoroughly blended.

Vanilla Cream Cheese Frosting (Enough for an 8 x 8 pan, double for 9 x 13)
Ingredients:
  • 4 ounces cream cheese, room temperature
  • 1/2 stick butter, room temperature
  • 1 tsp vanilla extract
  • 2 - 3 cups confectioners sugar
Directions:
  1. In a large bowl with an electric mixer, beat the cream cheese and butter until light and fluffy. Gradually add the confectioners’ sugar 1 cup at a time, mixing thoroughly after each addition and scraping down the sides of the bowl often. Continue to beat on medium speed until light and fluffy, 3 to 4 minutes