Dulce de Leche Cheesecake Squares


Did you ever have one of those recipes where you had it bookmarked forever, and then you finally make it and you want to kick yourself for waiting so long? Well that is exactly what happened here. I can't even tell you how long this has been sitting in my list of "to make" recipes. Oh how I wish I had made these sooner!

Dulce de leche is hard to come by around here and I haven't gotten around to trying to make my own (plus that whole exploding can rumor kind of scares me). However, when I was in Miami over the holidays, there were jars of dulce de leche in every grocery store. I picked up one up and I knew exactly what I'd be making with it! These cheesecake squares are creamy and rich and decadent. Make sure you cut them into small pieces because just a bite or two is enough. I really love the way the creamy cheesecake contrasts with the texture of the glaze on top. At first I actually thought about skipping the glaze because I didn't want the chocolate to overpower the cheesecake, but I'm really glad I made it. Plus, it makes them look a heck of a lot more impressive.

I originally found the recipe on Smitten Kitchen. And after reading through Deb's description and a lot of the comments I noticed that some people mentioned it didn't have a strong dulce de leche flavor. It was more of a cheesecake flavor with a hint of dulce de leche. I decided to up the amount of dulce de leche I used. I figured I could do that and it would still hold its shape because the squares contain gelatin. You'll probably notice my squares are a little darker than Deb's and that's why. I reflected my change in the recipe below.

Recipe: Adapted from Smitten Kitchen Ingredients

For crust
3 1/2 oz graham crackers, crumbled (1cup)
2 tablespoons sugar
3 tablespoons unsalted butter, melted

For filling
1 teaspoon unflavored gelatin (from a 1/4-oz envelope, will be just about half an envelope)
1/4 cup whole milk
8 oz cream cheese, softened
2 large eggs
3/8 teaspoon salt
1 1/4 cup dulce de leche

For glaze
3 oz fine-quality bittersweet chocolate (not unsweetened), coarsely chopped
1/2 stick (1/4 cup) unsalted butter, cut into pieces
2 teaspoons light corn syrup

Directions

Make crust: Put oven rack in middle position and preheat oven to 325°F. Line bottom and sides of an 8-inch square baking pan with 2 sheets of foil (crisscrossed), leaving a 2-inch overhang on all sides.

Finely grind crackers with sugar and a pinch of salt in a food processor. With motor running, add butter, blending until combined. Press mixture evenly onto bottom of baking pan. Bake 10 minutes, then cool in pan on a rack 5 minutes.

Make filling: Sprinkle gelatin over milk in a small bowl and let stand 2 minutes to soften. Beat together cream cheese, eggs, salt, and gelatin mixture in a bowl with an electric mixer at medium speed until well combined, about 2 minutes, then stir in dulce de leche gently but thoroughly. Pour filling over crust, smoothing top, then bake in a hot water bath (I was able to fit mine in a 9×13-inch baking pan) in oven until center is just set, about 45 minutes. Cool cheesecake completely in pan on rack, about 2 hours. Chill, covered, at least 6 hours.

Glaze cake within 2 hours of serving: Heat all glaze ingredients in a double boiler or a small metal bowl set over a saucepan of barely simmering water, stirring until smooth, then pour over cheesecake, tilting baking pan to coat top evenly. Chill, uncovered, 30 minutes.

Lift cheesecake from pan using foil overhang and cut into 1-inch squares with a thin knife, wiping off knife after each cut. (Don’t skip this step! A clean knife is essential for uber-neat squares.)

Note: Cheesecake (without glaze) can be chilled up to 3 days

Smores Cookies


These pictures should really speak for themselves, but in case you need more convincing, here we go. Chocolate chip cookie + graham cracker + marshmallows + hersheys bar = AMAZING.

I made these for the Super Bowl and everyone was really impressed with how they looked and tasted. I love the what the graham cracker crumbs add to the cookie. It really brings home that smores taste. And I absolutely love the way you can still see the letters on the Hershey bar.


Do you really need me to say more here? Just look at the picture! Go make these! Now! :)

Recipe: Adapted from Baked Perfection
Ingredients
  • 1 1/2 cups all purpose flour
  • 1 cup graham cracker crumbs
  • 1 teaspoon baking soda
  • 1 teaspoon salt
  • 1 dash of cinnamon
  • 1 cup (2 sticks) butter, softened
  • 3/4 cup sugar
  • 3/4 cup brown sugar
  • 1 teaspoon vanilla extract
  • 2 eggs
  • 1 1/2 cups chocolate chips
  • 1 1/2 cups mini marshmallows
  • 3 Hershey bars, chopped
Directions
  1. Preheat oven to 375 degrees.
  2. In a medium bowl combine the flour, graham cracker crumbs, baking soda, salt, and dash of cinnamon. In a second larger bowl beat together the butter, sugar, brown sugar and vanilla extract until creamy. Add the eggs one at a time, beating well after each addition. Slowly beat in the flour mixture until smooth. Stir in the chocolate chips. Drop by rounded tablespoon onto ungreased cookie sheet (I chilled the dough for an hour first; I always do).
  3. Bake for 8 minutes, and remove from the oven. Push 3 to 4 marshmallows and a few pieces of hershey bar into each cookies. Return to the oven and bake an additional 2-3 minutes until fully cooked. Cool cookies on a wire rack.

Ricotta Ice Cream


I was so intrigued by this recipe that the second I saw it I knew I had to try it. So nevermind the fact that there's a blizzard outside, last night I was making ice cream. This ice cream tastes just like a frozen cannoli! The taste of the ice cream is incredible. The texture on the other hand is a little weird. It was sort of grainy because of the ricotta. I guess that I should throw out a disclaimer that I am very picky about textures. I don't like cottage cheese because it's too lumpy; I don't like pudding because it's too smooth (this is weird, I know). Ross didn't mind the texture at all. In fact, he loved everything about this ice cream.

The ice cream itself is really simple to make. It's basically just combining ricotta, milk, simple syrup, and vanilla extract and then pouring it into the ice cream maker. And I guess as far as ice creams go this one is on the healthier side. There are no eggs or heavy cream.

I decided to just make the ice cream and not the cones, but I think these would actually be very good inside of cones (or cannoli shells!) because the I think the crunchiness of the cones would disguise the grainy texture a little more. If you're looking for a really rich and creamy, decadent ice cream, then this isn't it. But if you want something delicious and different, try this!

Ricotta Ice Cream
Recipe: Giada de Laurentiis, Food Network
Ingredients:
  • 1 (15-ounce) container whole milk ricotta
  • 1 cup whole milk
  • 1 cup simple syrup, recipe follows
  • 1/2 teaspoon vanilla extract
  • 1/2 cup semisweet chocolate chips* (the original recipe calls for 1 cup, but I thought 1/2 was perfect)
Directions:
  1. In a medium bowl, whisk together ricotta cheese and milk until smooth. Add the simple syrup and vanilla extract. Stir to combine.
  2. Pour the ricotta mixture into an ice cream maker and freeze according to the manufacturer's directions. Add the chocolate chips 10 minutes before the end of freezing.

Simple Syrup
  • 1/2 cup water
  • 1 cup sugar

In a saucepan, combine water and sugar over medium heat. Bring to a boil, reduce heat and simmer for 5 minutes, stirring occasionally, until the sugar has dissolved. Take the pan off the heat and allow the syrup to cool.

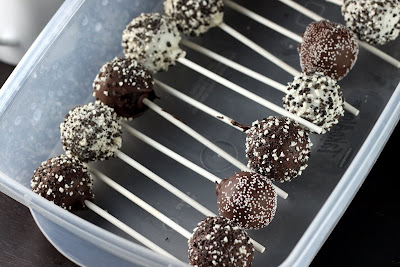
Cake Pops


I've been seeing these pop up around the internet for a while now. I've been waiting for a good reason to make them and I finally found one.... a cold, gray Saturday with nothing to do. These were a lot of fun to make (I even got Ross to help with the dipping and sprinkle application and even though he'll never admit it, I think he actually had fun!).


They are a little time consuming so make sure you have enough time or just bake the cake/roll the cake balls the day before. It's really important to make sure your cake balls are chilled really well before you start the dipping process. I was really impressed with how cute these were. What was even more impressive though was how good they tasted! I knew they were going to be adorable but I had very low expectations for how it was actually going to taste since it was boxed cake mix after all... but these were actually really good!

Step by step directions can be found here at Bakerella. I chose to use Devil's Food Cake and Cream Cheese frosting.

(This is the reject pile. A.K.A. the ones that I'm keeping)

Mint Chocolate Chip Cookies


It's funny how sometimes we stumble across the best recipes when we're hardly expecting it. Normally when I bake something, it's planned out pretty far in advance. I have an ever-growing "to bake" list of recipes that I want to try. For instance, right now Chai Cupcakes, Chocolate Ginger Cookies, and S'mores Cookies are next up to bat. I usually know a few days ahead of time when I'm going to bake and I hardly ever bake on a whim. But the other night I found myself with a few hours of free time and as we were sitting on the couch relaxing I declared to Ross "I'm going to bake some cookies."


I didn't want to have to go out to get ingredients so I wanted to make something with ingredients I had on hand. This ruled out all of the aforementioned to bake items. I found this recipe for Mint Chocolate Chip cookies on Lovin From the Oven. (If you haven't check our her blog, go now, it's awesome!). I wasn't expecting much from the cookies because she actually said that she didn't like them...actually I believe she said she hated them. She didn't like the peppermint extract in the cookies. I was prepared to hate them. I wasn't even planning to blog about them. BUT, the second I took a bite of one (about 11:00 PM on Sunday night) I had to grab my camera immediately and start taking pictures (albeit pretty bad ones, but the cookies make up for it, I promise). You, yes you, need to make these cookies.

I actually made 2 batches because I was little scared about the warning that came with the original recipe. One with peppermint extract as stated and one with a teaspoon of vanilla extract instead. They were both amazing, but everyone preferred mint ones more. The mint was not overpowering at all; it was just right. Even if you don't like mint make these cookies with vanilla because they're sooo good. They are thick and chewy and they have a perfect, slightly crispy exterior. And do you know what the best part is? They are EASY. No need for 2 kinds of flours, no extra egg yolk, no chilling for 36 hours, no gourmet chocolate that's $10/lb. Just plain old delicious chocolate chip cookies (with a little bit of mint).

Recipe: Adapted from Lovin' From the Oven
Ingredients:
  • 1 1/2 cups of all purpose flour
  • 1/2 tsp. of salt
  • 1/4 tsp. of baking soda
  • 1/2 cup of butter at room temperature
  • 1/2 cup of tightly packed light brown sugar
  • 1/3 cup of granulated sugar
  • 1 egg (beaten)
  • 1/4 tsp. of peppermint extract
  • 1 cup of chopped dark chocolate (I used 1/2 c. semi-sweet chips and 1/2 c. bittersweet)

Directions:

  1. In a medium bowl, sift together the flour, baking soda, and salt. Set aside.
  2. In a larger bowl, beat the butter and sugars together on medium speed until light and fluffy (about 2-3 minutes). On low speed, slowly add the beaten egg and peppermint extract. Beat to combine, scrape down the sides of the bowl.
  3. Add the flour mixture and beat just until there are no more streaks of flour. Stir in the chopped dark chocolate by hand. Cover and refrigerate for an hour.
  4. Preheat the oven to 350F. Line baking sheets with parchment paper. Scoop out well rounded tablespoonfuls of the dough and roll them into balls. Leave about 2 inches between each ball. Bake for 10-12 minutes. If you prefer crispier cookies increase the baking time by 1-2 minutes. Allow the cookies to cool on the baking sheet for a few minutes before removing.

Vanilla Cupcakes with Vanilla Bean Buttercream & Chocolate Buttercream


Ok I know it's been a while since I blogged. Things have been a little crazy lately. First there was finals which is busy season for me since I run a tutoring company. Then I was on vacation in Miami for 3 weeks (I know, tough life) and while I did do a little baking, I didn't take any pictures. Now I'm finally back home and starting to settle into routine again. So I bring you these...

We had some friends coming over the night to play board games and I really wanted to try out a new decorating tip that I got so I figured I'd whip up a batch of cupcakes. To me, finding the perfect cupcake recipe is sort of like finding the perfect chocolate chip cookie recipe. Everyone has their own favorite and even when you find one that you think is the best, you just can't help yourself from trying other ones. Well, I'm glad I kept trying new recipes because this one is amazing.

The cupcakes came out perfect. I've made cupcakes that have sunk in the middle, that have been dry, that have a top that's too domed, etc. And while they all taste good, I want one that tastes good AND looks good. Really, is that too much to ask? Well this is it. The cake was flavorful, moist, and it rose just the right amount leaving a perfect canvas for frosting.

For the frosting I made a Vanilla Bean Buttercream. I always use Magnolia's Vanilla Buttercream recipe which is simple and delicious. However, I had been seeing a fair amount of recipes with shortening in them lately so I decided to add about a tablespoon of shortening to the recipe. This really gives the buttercream some stability. I took half the buttercream and added a vanilla bean and I took the other half an added a few spoonfuls of cocoa powder. The vanilla buttercream was amazing. I could (and perhaps did) eat that stuff by the spoonful. The chocolate? Eh. I don't think cocoa powder is the way to go for chocolate buttercream. Next time, I'll be less lazy and actually use melted chocolate.

I got the recipe from My Baking Addiction who got it from Baking at Home with the Culinary Institute of America. Be sure to check out her blog because she turns the cake into Cinnamon Swirl Cupcakes which look divine! The original recipe is for a an 8" cake, but if you want to make cupcakes just fill the cupcakes about 2/3 full and bake for 18 - 20 minutes. (Note: I cut the recipe in half and got 16 cupcakes)

Recipe: Yellow Butter Cake from Culinary Institute of America

Ingredients
  • 3 ½ c cake flour
  • 2 c sugar
  • 1 Tbsp baking powder
  • ½ tsp salt
  • 1 c (2 sticks) butter, unsalted, diced, at room temperature
  • 1 c whole or low-fat milk (divided use)
  • 4 large eggs
  • 2 large egg whites
  • 2 tsp vanilla extract

Directions:
  1. Preheat the oven to 350F. Coat two 8” cake pans lightly with cooking spray
  2. Sift the flour, sugar, baking powder and salt into the bowl of a stand mixer fitted with the whisk attachment or a large mixing bowl. Add the butter and ½ cup of the milk. Mix on medium speed until smooth, about 4 minutes, scraping down the bowl with a rubber spatula as needed.
  3. In a separate bowl, blend the eggs, egg whites, the remaining ½ cup milk and the vanilla extract. Add to the batter in 3 additions, mixing for 2 minutes on medium speed after each addition. Scrape down the bowl between additions.
  4. Divide the batter evenly between the two pans. Bake until the layers spring back when touched lightly in the center, 35-40 minutes.
  5. Remove the layers from the oven and cool completely in their pans on wire racks. Release the sides and bottom of the layers from the pans with a narrow metal spatula or a table knife before unmolding and finishing with fillings and icings.

Chocolate Toffe Cinnamon Chip Cookies


I stopped in a grocery store that I don't usually shop at the other day just to pick up a few things. As I was making my way down the aisle I saw a bag of cinnamon chips out of the corner of my eye. My husband looked at me like I was crazy as I immediately grabbed 2 bags with a huge smile on my face and tried to (calmly) explain to him how I've tried looking in our regular grocery store for cinnamon chips so many times but never found them.

I had a hard time deciding what I want to make with them (luckily I bought 2 bags and now I know where to buy more) but ultimately decided on some chocolate toffee cinnamon chip cookies when I saw the bag of heath pieces in my pantry. I was a little worried that I might be throwing too many flavors into one cookie, but once I tasted the cookie I realized I had nothing to be worried about! All the flavors married together amazingly!

These are really good. They have a perfect chew with a crispy exterior. The cinnamon and toffee makes them a perfect fall cookie. I decided to use mini chocolate chips because I didn't want the chocolate to overwhelm the cinnamon and toffee. I ended up using about 1/3 cup of cinnamon chips because I was worried about it tasting too cinnamon-y. You could definitely taste the cinnamon but it wasn't overpowering. If you really like cinnamon then add more, but I liked them just they way they were!

I will definitely be making these again, but in the mean time I'll be looking for other recipes to use my remaining bag of cinnamon chips. (Hint, hint... suggestions welcome!)

Recipe - Makes 20 - 30 cookies
Adapted from AllRecipes
Ingredients:
  • 2 cups bread flour (regular will work fine too)
  • 1/2 teaspoon baking soda
  • 3/4 teaspoon salt
  • 3/4 cup unsalted butter, melted
  • 1 cup packed brown sugar
  • 1/2 cup white sugar
  • 1 tablespoon vanilla extract
  • 1 egg
  • 1 egg yolk
  • 2 Tablespoons milk
  • 1 cup toffee bits
  • 1/2 cup mini semisweet chocolate chips
  • 1/2 cup cinnamon chips
Directions
  1. Preheat the oven to 325 degrees F (165 degrees C). Line cookie sheets with parchment paper.
  2. Sift together the flour, baking soda and salt; set aside.
  3. In a medium bowl, cream together the melted butter, brown sugar and white sugar until well blended. Beat in the vanilla, egg, egg yolk, and milk until light and creamy. Mix in the sifted ingredients until just blended.
  4. Stir in the chocolate chips, toffee chips, and cinnamon chips by hand using a wooden spoon. (At this point I like to chill the dough for at least 1 hour. If you don't they will still taste amazing but they may spread a little)
  5. Drop cookie dough by rounded spoonfull onto the prepared cookie sheets. Cookies should be about 2-3 inches apart.
  6. Bake for 15 in the preheated oven, or until the edges are lightly toasted. Cool on baking sheets for a few minutes before transferring to wire racks to cool completely.