Multi-Grain Waffles


I've never really been big on making breakfast. My usual morning routine is scarfing down a bowl of Special K with some honey, cinnamon, and a banana while I check my email. Occasionally, I'll have some oatmeal but most days I can't be bothered to be to put a bowl in the microwave for 90 seconds (I know, I'm ridiculous) so clearly any sort of waffle/pancake/omelette during the week is out of the question.

This weekend I got a very undeniable waffle craving though. Besides, I figured it was about time to put the waffle maker to use. The one we got for our wedding. The one that's been sitting in the back of the kitchen cabinets for almost 2 years now. I decided to go for a multi-grain waffle that uses whole wheat flour. After seeing the list of ingredients I wasn't sure how they were going to come out. It seems rather healthy for a waffle. They actually came out really good though. As in, I'll probably be making them on a regular basis (only on weekends of course). They definitely don't have the perfect texture. The exterior could be a little crispier and the inside could be a little lighter and fluffier, but the taste is spot on. If you're looking for a healthy waffle recipe, give this a shot.

(Marcus REALLY wanted to try these. I swear he practices this look when we're not home!)

Multi-Grain Waffles: Makes 8 waffles
Adapted from:
FoodNetwork.com
Ingredients:

  • 2 cups buttermilk
  • 1/2 cup old-fashioned rolled oats
  • 2/3 cup whole-wheat flour
  • 2/3 cup all-purpose flour
  • 1/4 cup toasted wheat germ or cornmeal
  • 1 1/2 teaspoons baking powder
  • 1/2 teaspoon baking soda
  • 1/4 teaspoon salt
  • 1 teaspoon ground cinnamon
  • 2 large eggs, lightly beaten
  • 1/4 cup packed brown sugar
  • 1 tablespoon canola oil
  • 2 teaspoons vanilla extract
  • 1/4 teaspoon almond extract (optional, but gives them a great nutty flavor)
Directions:
  1. Mix buttermilk and oats in a medium bowl; let stand for 15 minutes.

  2. Whisk whole-wheat flour, all-purpose flour, wheat germ (or cornmeal), baking powder, baking soda, salt and cinnamon in a large bowl.

  3. Stir eggs, sugar, oil and vanilla into the oat mixture. Add the wet ingredients to the dry ingredients; mix with a rubber spatula just until moistened.

  4. Coat a waffle iron with cooking spray and preheat. Spoon in enough batter to cover three-fourths of the surface (about 2/3 cup for an 8-by-8-inch waffle iron). Cook until waffles are crisp and golden brown, 4 to 5 minutes. Repeat with remaining batter.

Black Bean Turkey Chili


Okay, so I know that for a blog called "SugarCooking" I've had a serious lack of sugar related posts lately. I've just been craving really hearty, healthy foods lately. So I figured instead of not blogging at all, I'd just blog about all the healthy things I've been making. (I know, boring). But fret not, I promise to return with some sugar laden, full fat treats soon.

So about this chili. It's easy, it's delicious, it's filling, and it's healthy. I found this chili to be just about perfect. It has a little heat but it's not too spicy. If you like things really spicy feel free to dial up the cayenne or even add in some chopped jalepeno. This is a perfect meal for a cold, snowy night; it will warm you right up. Enjoy!

Black Bean Turkey Chili: Adapted from AllRecipes
Ingredients:
  • 1 tablespoon vegetable oil
  • 1 onion, diced
  • 2 cloves garlic, minced
  • 1.3 lb ground turkey (I use 93/7)
  • 28 oz can crushed tomatoes
  • 3 cans black beans, undrained
  • 1 1/2 tbls chili powder
  • 1/tsp cumin*
  • 1 tbls dried oregano
  • 1 tbls dried basil
  • 1 tbls red wine vinegar
  • 1 tbls worchestershire sauce
  • 1/2 tbls brown sugar
  • 1 tsp cocoa powder ** (see note)
  • 1/4 tsp red pepper flakes
  • 1/4 tsp cayenne peper
  • salt and pepper to taste
Directions:
  1. Heat the oil in a large heavy pot over medium heat; cook onion and garlic until onions are translucent.
  2. Add turkey and cook, stirring, until meat is brown. Stir in the rest of the ingredients. Reduce heat to low, cover and simmer 60 minutes or more, until flavors are well blended.
  3. Serve with sour and cheese, if desired.
Notes:
* I find cumin to have a very overpowering taste so I always reduce the amount called for. Feel free to add more if you like the flavor.
** I've seen a few recipes add cocoa powder to them so I tried it because I was curious. I don't know if there was a noticeable difference. I don't think I used enough to actually taste it.

Chicken, Spinach, Goat Cheese Quesadillas with an Avocado Sour Cream


These quesadillas are delicous, quick, and healthy... what more can you ask for? I recently got a new grill pan because I've been seriously missing the summer time grilling. All this snow is just too much for a Florida girl to get used to! I figured I'd try out the grill pan with this quesadilla recipe.

Since I pretty much love anything with spinach and goat cheese in it, it's no surprise that I loved these quesadillas. They really came out perfect. The cheese was melting and gooey on the inside and the tortilla was crisp on the outside.

I can't remember where I first read this (although I wish I did so I could give you credit!), but I remember someone suggesting to toast the inside part of the tortilla on the pan for about 30 seconds before you put the fillings on. That way is crisps up just a little bit; enough to prevent the cheese from making the inside of the quesadilla soggy. Brilliant, right?

This recipe is obviously quite adapatable to your likes and dislikes. I also put in some monterey jack cheese to give it that gooey melty texture. I think caramelized onions would be great in here, as would roasted garlic. All the recipe quantities are approximate, but just common sense and put them on in quantities that look right.

Chicken, Spinach, Goat Cheese Quesadilla

Ingredients:

  • Flour Totrillas (whole wheat would work fine too)
  • Chicken (cooked and sliced)
  • Garlic (1 tsp., minced)
  • Baby Spinach (1 pre packaged bag)
  • Salt, Pepper, & Cayenne Pepper to taste
  • Goat Cheese (4 oz, crumbled)
  • Reduced Fat Shredded Monterey Jack
  • Non-Stick cooking spray or olive oil
Directions
  1. Heat the spinach with the garlic, salt, pepper, and cayenne pepper over medium-low heat in a pan until just wilted. Remove from heath and set aside.
  2. Heat the grill pan (or regular pan) over medium-high heat. Spray with non-stick cooking spray or drizzle with olive oil. Toast the inside of the tortilla for about 30 seconds.
  3. Take the tortilla off the grill pan and assemble as follows. Over half the quessadilla sprinkle about 2 tablespoons of monterey jack cheese, following by a few slices of chicken, then the spinach, then the crumbled goat cheese.
  4. Add to the grill pan and cook for about 1 - 2 minutes. Carefully use a spatula to flip the empty half of the tortilla onto the loaded half. At this point I like to let the quesadilla cook for about 30 more seconds, then flip it over. Give it another 1 -2 minutes, then remove from the pan and enjoy!
Avocado Sour Cream
Ingredients
  • 1 Avocado, chopped
  • 1/3 c. sour cream
  • 1 T maynoaise
  • 1 lime juice
  • 1/4 t onion powder
  • salt and pepper to taste
Directions
  1. Use a fork to mash the avocado as much as you can. (You can put it in the food processor if you want a smoother dip, but I just use a fork and a spoon).
  2. Combine it with all other ingredients and stir together.
Note: If you want a thinner dip, stir in a few tablespoons of buttermilk. If you want a smoother dip, throw everything in the food processor.

Lemon Cake Mix Cookies


Anyone who knows me knows that I absolutely love lemon, so when I saw how ridiculously simple this recipe was I knew I had to try it. It uses boxed cake mix (which I almost never do!) and just requires throwing in a few eggs, some oil, and some fresh lemon juice and zest.

I think the fresh lemon zest and juice is what really brings things cookies to another level. It somehow gives that boxed mix a fresh taste. These are not the best cookie in the world, but they are pretty darn good and so easy to make. So if you have a box of lemon cake mix sitting in your pantry, whip this up!

The only recommendation I would make is be sure not to underbake these. While underbaked cookies are sometimes yummy underbaked cake batter is just kinda gross. I ended up baking mine for just about the full 9 minutes.

Lemon Cake Mix Cookies: From My Baking Addiction
Ingredients
  • 1 (18.25 oz) package lemon cake mix
  • 2 eggs
  • 1/3 c vegetable oil
  • 2 teaspoons of lemon zest
  • 2 tablespoons of fresh lemon juice
  • 1/2 teaspoon lemon extract
  • 1/3 cup confectioner's sugar
Directions
  1. Preheat oven to 375 degrees.
  2. Pour cake mix into a large bowl. Stir in eggs, oil, lemon juice, lemon extract, and lemon zest until blended.
  3. Drop teaspoonfuls (mine were probably a tad bigger) of dough int o a bowl of confectioner's sugar. Roll them around until they're lightly covered (It may help to put the dough in the fridge for a little while first). Once sugared, put them on an ungreased cookie sheet.
  4. Bake for 6 - 9 minutes in the preheated oven.

Baked Sweet Potato Fries with a Honey Lime Dip


I absolutely love sweet potato fries. If I'm at a restaurant and they're on a menu, chances are that I'm ordering them. I even manage to convince myself that they're "healthier" since you know, they're sweet potatoes not evil white potatoes. Never mind the fact that they are fried and oily.

With these fries I don't have to convince myself that they're healthier because they are. No frying here! These "fries" are baked in oven. They came out a lot better and crispier than I had expected. The real trick to these is to make sure that they're all cut the same size so they cook evenly. I like my fries a little on the skinnier side so I cut mine pretty small. You definitely don't want them big like steak fries otherwise they'll never crisp up the way you want. Also, make sure that you have a really good knife to work with because cutting through raw potatoes can be a tough job. These fries are worth it though!

The dipping sauce is completely optional because the fries are great without it, but we all know that having something to dip your food into makes it more fun (and tasty)!

Recipe: Baked Sweet Potato Fries with a Honey Lime Dip
From: Our Best Bites
Ingredients:
  • 2 medium sized sweet potatoes
  • 2 T extra virgin olive oil
  • 1/2 t cumin
  • 1/2 t oregano
  • 1/2 t coriander
  • 1 t kosher salt
  • 1 t parsley
  • fresh ground paper to taste
Directions:
  1. Preheat oven to 425 degrees. Spray a cookie sheet lightly with cooking spray.
  2. Slice your sweet potatoes into french fry shape and size. About 1/4" (maybe a tad bigger). Check out this site for a picture guide on cutting the fries.
  3. Put the sweet potatoes in a bowl and drizzle with olive oil. Use your hands to make sure they are evenly coated.
  4. Add all the herbs and spices and continue to toss until well coated.
  5. Place in the preheated oven for 15 minutes. No opening the oven door! Not even for a quick peak!
  6. After 15 minutes, take them out and flip them. Be careful as they may be a little soggy at this point.
  7. Continue to cook for another 15 - 20 minutes. Take out of the oven and serve immediately.

Recipe: Honey Lime Dipping Sauce
Adapted From: Our Best Bites
Ingredients:
  • 6 oz container non-fat greek yogurt, plain
  • 1 T mayo (reduced fat is fine)
  • 1/2 T honey
  • Juice from half a lime (or more to taste)
  • 1/4 t cumin
  • 1/8 t oregano
  • 1 t parsley
  • 1/2 t onion powder
  • 3/4 t salt
Directions:
  1. Mix honey, yogurt, mayo, and lime together until combined.
  2. Add in spices and herbs.

Japanese Cucumber Salad


There was this pan-Asian restaurant where I went to college that always served a side of cucumber salad with whatever meal you ordered. It was simple and it was perfect. Vinegary, slightly sweet, and slightly spicy. I've tried numerous times to recreate the recipe and while I've gotten close a few times, I always knew I just missing the mark. That is, until now!

I tried this recipe last night and it was exactly what I was looking for, nothing more and nothing less. This is really easy to throw together and can be made ahead. It's a very light and refreshing salad that is a great side to any Asian influenced meal. I served it alongside a honey-ginger grilled chicken breast and brown rice.

Recipe: Japanese Cucumber Salad (Adapted from: For the Love of Cooking( Ingredients:
  • 1 english (hothouse) cucumber, peeled
  • 1 tsp salt
  • 1/2 cup seasoned rice vinegar
  • 1/2 cup of water
  • 3 tbsp sugar
  • 1/4 tsp crushed red pepper
Directions:
  1. Peel the cucumber then cut in half lengthwise. Take a small spoon and scoop out all the seeds from the cucumber. Cut into bite size pieces and place in a colander, sprinkle with salt and toss well. Drain 1 hour. Place on several layers of paper towels. Let stand for 5 minutes, pressing down occasionally. Rinse and pat dry.
  2. Combine vinegar, water, sugar, and pepper in a small saucepan; bring to a boil. Reduce heat, cook until reduced to 1/3 cut (about 10 minutes). Remove vinegar reduction from heat; cool. Combine cucumbers and vinegar deduction in a medium bowl; toss well. Enjoy.

Perfect Pizza Crust and Roasted Garlic Chicken Pesto Pizza


I've been wanting to make my own pizza crust for a really long time, but for some reason I've been hesitant. I've never been much of a bread beaker and I tend to avoid recipes that deal with kneading or rising. Yesterday, though, Ross and I decided to be brave and try making our own pizza dough for Valentines Day dinner. (On a side note: I absolutely love when Ross gets involves with a cooking project. It makes it a lot more fun. Ross, if you're reading this. Hint, Hint!)

If you're going to start making pizza dough I figured that a recipe called "Perfect Pizza Crust" was the place to start. I cannot express to you just how impressed I was with this recipe. It had a big name to live up to, and it did. The crust really is pefect. It's the perfect thickness and it's crispy yet chewy at the same time. The pizza that came out of the oven was one of the best pizzas I've ever eaten. I couldn't stop marveling in our accomplishment and that made every bite taste better! I can't wait to try this recipe again subbing some of the white flour for whole wheat.

If you're at all thinking about tackling pizza dough from scratch, search no further. This is the recipe you want.

I chose to throw some roasted garlic, pesto, chicken, mozzarella, and parmesan on mine, but with this dough I'm sure you could put anything on it and it would still be amazing!

The Perfect Pizza Curst
Source: Annies Eats (great blog!) orginally from Baking Illustrated
Ingredients:
  • 1/2 cup warm water (about 110 degrees)
  • 1 envelope (2 1/4 tsp.) instant yeast
  • 1 1/4 cups water, at room temp
  • 2 tbsp extra virgin olive oil
  • 4 cups (22 oz.) bread flour, plug more for dusting
  • 1 1/2 tsp salt
  • Cornmeal
  • olive oil or non-stick cooking spray for greasing bowl
Directions:
  1. Measure the warm water into a 2-cup liquid measuring cup. Sprinkle in the yeast and let stand until the yeast dissolves and swells, about 5 minutes. Add the room temperature water and oil and stir to combine.
  2. Place the flour and salt in the bowl of a stand mixer fitted with the paddle attachment. Briefly combine the dry ingredients at low speed. Slowly add the liquid ingredients and continue to mix at low speed until a cohesive mass forms. Stop the mixer and replace the paddle with the dough hook. Knead until the dough is smooth and elastic, about 5 minutes. Form the dough into a ball, put it in a deep oiled bowl, and cover with plastic wrap. Let rise until doubled in size, about 1 ½ to 2 hours. Press the dough to deflate it.
  3. To bake, place a pizza stone in the lower third of the oven. Heat the oven to 500° for at least 30 minutes. Turn the dough out onto a lightly floured work surface. Divide the dough into two equal pieces. Form both pieces of dough into smooth, round balls and cover with a damp cloth. Let the dough relax for at least 10 minutes but no more than 30 minutes.
  4. Working with one piece of dough and keeping the other covered, shape the dough and transfer to a pizza peel or round of parchment dusted with semolina or cornmeal. Top as desired. Slide the dough onto the pizza stone. Bake until the crust edges brown and cheese is golden brown in spots, about 8 to 12 minutes. Repeat with remaining ball of dough or freeze for later use.


Recipe: Roasted Garlic Chicken Pesto Pizza Adapted from Annies Eats Ingredients:
  • 1 perfect pizza crust (recipe above)
  • 1/2 cup prepared pesto (store bough or homemade)
  • 1 bulb of garlic
  • 1 boneless, skinless chicken breast, cooked
  • Mozzarella cheese
  • Parmesan cheese
Directions:
  1. To roast the garlic: Peel away the outer layers of the garlic bulb skin, leaving the skins of the individual cloves intact. Using a knife, cut off 1/4 to a 1/2 inch of the top of cloves, exposing the individual cloves of garlic. Place the garlic heads in a baking pan; muffin pans work well for this purpose. Drizzle a couple teaspoons of olive oil over each head, using your fingers to make sure the garlic head is well coated. Cover with aluminum foil. Bake at 400°F for 30-35 minutes, or until the cloves feel soft when pressed. Remove garlic gloves and smash with a fork.
  2. Spread roasted garlic over pizza dough. Do this to taste. I used almost the whole (small) bulb, but I LOVE roasted garlic.
  3. Spread the pesto on the pizza.
  4. Add the sliced, cooked chicken.
  5. Sprinkle with mozzarella.
  6. Top with fresh grated parmesan.
  7. Bake on preheated pizza stone for 8 - 12 minutes.

Thai Pineapple Fried Rice


After people see my blog/receive a plethora of baked goods from me, I get asked the same question a lot. "How are you NOT 300 pounds?". Well the answer is actually pretty simple. I don't eat dessert for breakfast, lunch, and dinner! Well it's little more complicated than that. For one, I go to the gym at least 4 - 5 days a week for about an hour. Second, I try to give away about 98% of what I bake. Usually I'll keep a couple of whatever I make in the house and send the rest out of the house as soon as possible. At the very least, I put it in the freezer (but let's be honest, that's not gonna keep me away for too long). I also (try) to limit my baking, and desserts in general, to once a week. Obviously, there are exceptions to this but I do well with guidelines so that's what I tell myself. And finally, and most importantly, I actually eat really healthy when it comes to non-dessert related items. I do the whole shebang. Whole grains, lots of fresh fruit and veggies, and lean proteins.

Sugar is my weakness. I go all out when it comes to sugar. Everything I bake is usually all the way. I give myself that liberty because of the above reasons and because when it comes to savory stuff I have no problems going light. I use reduced fat/non fat items on a regular basis. I swap out lean ground turkey for ground beef whenever I can. (I can't even remember the last time I ate a cheeseburger). You could tell me that I'm not allowed to eat another french fry for as long as I live and I'd be okay with that; but if you were to tell me no more cookies or ice cream then we'd have a problem.

So how come all you've seen so far is the sweet stuff? Well for one the blog is called "SugarCooking". But more realistically there are actually a few good reasons. 1) It gets dark around 6:00 at this time of year and that makes it hard to take pictures when we're sitting down to dinner. 2) Even if there was enough light to take pictures, I'm sometimes slow and I'd feel bad letting the food get cold so I could take pictures of it. 3) I actually eat a lot of the same foods (whole wheat pasta with a turkey bolognese, this pasta dish, grilled chicken with veggies, turkey and black bean chili) on a weekly basis and that would just be boring to blog about.

So why am I telling you about all this? Well, I'm going to make an effort to start blogging about more of the savory stuff I make. I've gotten a little faster at taking pictures and I have a good lighting set up now so that will take care of reasons 1 & 2 above. But the real driving force is I think this will inspire me to broaden the dinner repertoire in my house. So, I present to you the first of hopefully many healthy, savory dishes. This thai style pineapple fried rice is delicious. I was so impressed with how it came out. It was fragrant and flavorful and really hearty.

It came together really quickly. Just make sure you have all your ingredients prepped and measured before you start because everything goes into the pan pretty quickly so you won't have time to be running around measuring stuff in between steps. I chose to use brown rice instead of white rice. I also added tofu (quick, easy, and healthy) but I think chicken or shrimp would be a great addition too. The pineapple is absolutely the star of the meal though. It adds such an unexpected brightness and sweetness to the dish that really balances with the spices.

Thai Style Pineapple Fried Rice Recipe: Adapted from Closet Cooking
Ingredients:
  • 2 tablespoons oil
  • 2 shallots (thinly sliced)
  • 2 cloves garlic (minced)
  • 1 red chili (optional, I omitted it because I was scared)
  • 1 egg (lightly beaten)
  • 3 tablespoons chicken stock (or vegetable broth)
  • 3 tablespoons fish sauce (or soy sauce)
  • 1 tablespoon curry powder
  • 1 teaspoon sugar
  • 1/2 cup cashews (roasted)
  • 3-4 cups cooked brown rice (preferably a day old)
  • 1 cup pineapple cut into bite sized pieces
  • tofu (or any protein) (drained and cubed)
  • soy sauce
  • 1/4 cup peas (fresh or frozen)
  • 1/4 cup currants (or raisins)
  • 2 green onions (sliced)
Directions:
1. Heat the oil in a pan.
2. Add the shallots, garlic, chillies and stir-fry until fragrant, about a minute.
3. Add the egg and stir-fry for a minute.
4. Add the chicken stock, fish sauce, curry powder and sugar and stir-fry.
5. Add the cashews and stir-fry for 30 seconds.
6. Add the rice, break up any clumps and stir-fry for a few minutes.
7. Add the tofu and soy sauce to taste (I used about 1 tbls),gently stir.
8. Add the pineapple, peas and raisins and stir-fry to mix them in.
9. Remove from heat and serve garnished with chopped green onions.

Mini Red Velvet Cupcakes


Well I couldn't let Valentine's Day go by without baking some sort of dessert decorated with cute red, white, and pink sprinkles. These (not so red) red velvet cupcakes were the perfect vessel for such sprinkles. And the cream cheese icing. Ross will eat anything will cream cheese icing. Seriously I could serve him raw brussel sprouts with cream cheese icing and he'd gobble them down!

I decided to go the mini route because I think mini desserts are cuter, and well Valentine's Day is all about cute stuff. The red velvet cake came out really good. It was really moist and flavorful and everything you'd want from a red velvet cake. Unfortunately I didn't check the status of my red food coloring before I started putting together the batter so my cake didn't turn out as red as it should have.

I'm definitely keeping this in my collection for the next time the need for red velvet comes a long. The only thing I might change next time is to reduce the cocoa powder a little bit. I thought it tasted a little too chocolaty for red velvet, so I may knock it down to 2 tablespoons next time. Enjoy!

Recipe: Adapted from The Repressed Pastry Chef
Ingredients:
  • 1c cake flour
  • 1/4c cocoa
  • 1/2tsp salt
  • 2/3c vegetable oil
  • 3/4c sugar
  • 1 egg
  • 1oz (2T) red food coloring
  • 1/2tsp vanilla
  • 1/2c buttermilk
  • 1/2tsp baking soda
  • 3/4tsp white vinegar
Directions
  1. Preheat oven to 350 degrees.
    Line12-cupcake pans with cupcake liners and spray with cooking spray.
  2. Whisk cake flour, cocoa and salt in a bowl.
  3. Place oil and sugar in bowl of an electric mixer and beat at medium speed until well-blended. Beat in eggs one at a time.
  4. With machine on low, very slowly add red food coloring (and water or syrup, if necessary). (Take care: it may splash.) Add vanilla.
  5. Add flour mixture alternately with buttermilk in two batches. Scrape down bowl and beat just long enough to combine.
  6. Place baking soda in a small dish, stir in vinegar and add to batter with machine running. Beat for 10 seconds.
  7. Divide batter among cupcake pans, filling each about 2/3 full. Bake for about 12 minutes, until a toothpick inserted comes out clean.

Note:: The recipe above has been scaled down to 1/3 of the original recipe. The original recipe yields 3 dozen cupcakes: 3½ cups cake flour ½ cup cocoa powder 1½ teaspoons salt 2 cups vegetable oil 2¼ cups white sugar 3 large eggs 6 tablespoons (3 ounces) red food coloring 1½ teaspoons vanilla 1¼ cup buttermilk 2 teaspoons baking soda 2½ teaspoons white vinegar

Cream Cheese Frosting
Click here for my cream cheese frosting recipe

Coleslaw


Let me start by saying that I don't particularly like coleslaw (and on that note I don't like macaroni salad, potato salad, or egg salad). I basically don't like mushy things that are held together with copious amounts mayonnaise. This coleslaw is different though. It has a much lighter, fresher taste. It has the perfectly balance of sweet and tart.

I first stumbled across this recipe when I was having a bbq last summer and needed a quick side dish that I could make ahead. I wasn't even expecting to like the coleslaw, much less be making it again and again. But I was pleasantly surprised when I tasted it. It was nothing like the mushy, slimy stuff I had come to expect when hearing the word "coleslaw". I made it again last week for the super bowl to accompany some sliders I made. So, if you're a coleslaw hater, give this is a try. You may be surprised at how much you like it!

Recipe: Adapted from AllRecipes.com
Ingredients
  • 1 (16 ounce) package coleslaw mix *(See notes)
  • 2 tablespoons finely minced onion
  • 1/4 cup white sugar *(See notes)
  • 1/2 teaspoon salt
  • 1/8 teaspoon ground black pepper
  • 1/4 cup milk
  • 1/2 cup mayonnaise
  • 1/4 cup buttermilk
  • 1 1/2 tablespoons white wine vinegar
  • 2 1/2 tablespoons lemon juice
  • A sprinkling of poppy seeds (optional)
Directions
  1. Combine the coleslaw and onion in a large bowl.
  2. In a separate bowl, combine the sugar, salt, pepper, milk, mayonnaise, buttermilk, vinegar and lemon juice; mix until smooth. Pour mixture over the coleslaw and onion; stir well and chill for 1 hour.

Notes:
1. All I found was a 14 oz package of coleslaw mix. So I still made all of the liquid, I just didn't pour it all over the coleslaw. I'd suggest pouring about 2/3 of it, mixing it, and then going from there. You can always add more.
2. The original recipe called for 1/3 cup of sugar. Some of the reviews stated it was a tad too sweet so I cut it back a little. I think it could be cut back even more if you like a more tart coleslaw.

Dulce de Leche Cheesecake Squares


Did you ever have one of those recipes where you had it bookmarked forever, and then you finally make it and you want to kick yourself for waiting so long? Well that is exactly what happened here. I can't even tell you how long this has been sitting in my list of "to make" recipes. Oh how I wish I had made these sooner!

Dulce de leche is hard to come by around here and I haven't gotten around to trying to make my own (plus that whole exploding can rumor kind of scares me). However, when I was in Miami over the holidays, there were jars of dulce de leche in every grocery store. I picked up one up and I knew exactly what I'd be making with it! These cheesecake squares are creamy and rich and decadent. Make sure you cut them into small pieces because just a bite or two is enough. I really love the way the creamy cheesecake contrasts with the texture of the glaze on top. At first I actually thought about skipping the glaze because I didn't want the chocolate to overpower the cheesecake, but I'm really glad I made it. Plus, it makes them look a heck of a lot more impressive.

I originally found the recipe on Smitten Kitchen. And after reading through Deb's description and a lot of the comments I noticed that some people mentioned it didn't have a strong dulce de leche flavor. It was more of a cheesecake flavor with a hint of dulce de leche. I decided to up the amount of dulce de leche I used. I figured I could do that and it would still hold its shape because the squares contain gelatin. You'll probably notice my squares are a little darker than Deb's and that's why. I reflected my change in the recipe below.

Recipe: Adapted from Smitten Kitchen Ingredients

For crust
3 1/2 oz graham crackers, crumbled (1cup)
2 tablespoons sugar
3 tablespoons unsalted butter, melted

For filling
1 teaspoon unflavored gelatin (from a 1/4-oz envelope, will be just about half an envelope)
1/4 cup whole milk
8 oz cream cheese, softened
2 large eggs
3/8 teaspoon salt
1 1/4 cup dulce de leche

For glaze
3 oz fine-quality bittersweet chocolate (not unsweetened), coarsely chopped
1/2 stick (1/4 cup) unsalted butter, cut into pieces
2 teaspoons light corn syrup

Directions

Make crust: Put oven rack in middle position and preheat oven to 325°F. Line bottom and sides of an 8-inch square baking pan with 2 sheets of foil (crisscrossed), leaving a 2-inch overhang on all sides.

Finely grind crackers with sugar and a pinch of salt in a food processor. With motor running, add butter, blending until combined. Press mixture evenly onto bottom of baking pan. Bake 10 minutes, then cool in pan on a rack 5 minutes.

Make filling: Sprinkle gelatin over milk in a small bowl and let stand 2 minutes to soften. Beat together cream cheese, eggs, salt, and gelatin mixture in a bowl with an electric mixer at medium speed until well combined, about 2 minutes, then stir in dulce de leche gently but thoroughly. Pour filling over crust, smoothing top, then bake in a hot water bath (I was able to fit mine in a 9×13-inch baking pan) in oven until center is just set, about 45 minutes. Cool cheesecake completely in pan on rack, about 2 hours. Chill, covered, at least 6 hours.

Glaze cake within 2 hours of serving: Heat all glaze ingredients in a double boiler or a small metal bowl set over a saucepan of barely simmering water, stirring until smooth, then pour over cheesecake, tilting baking pan to coat top evenly. Chill, uncovered, 30 minutes.

Lift cheesecake from pan using foil overhang and cut into 1-inch squares with a thin knife, wiping off knife after each cut. (Don’t skip this step! A clean knife is essential for uber-neat squares.)

Note: Cheesecake (without glaze) can be chilled up to 3 days

Smores Cookies


These pictures should really speak for themselves, but in case you need more convincing, here we go. Chocolate chip cookie + graham cracker + marshmallows + hersheys bar = AMAZING.

I made these for the Super Bowl and everyone was really impressed with how they looked and tasted. I love the what the graham cracker crumbs add to the cookie. It really brings home that smores taste. And I absolutely love the way you can still see the letters on the Hershey bar.


Do you really need me to say more here? Just look at the picture! Go make these! Now! :)

Recipe: Adapted from Baked Perfection
Ingredients
  • 1 1/2 cups all purpose flour
  • 1 cup graham cracker crumbs
  • 1 teaspoon baking soda
  • 1 teaspoon salt
  • 1 dash of cinnamon
  • 1 cup (2 sticks) butter, softened
  • 3/4 cup sugar
  • 3/4 cup brown sugar
  • 1 teaspoon vanilla extract
  • 2 eggs
  • 1 1/2 cups chocolate chips
  • 1 1/2 cups mini marshmallows
  • 3 Hershey bars, chopped
Directions
  1. Preheat oven to 375 degrees.
  2. In a medium bowl combine the flour, graham cracker crumbs, baking soda, salt, and dash of cinnamon. In a second larger bowl beat together the butter, sugar, brown sugar and vanilla extract until creamy. Add the eggs one at a time, beating well after each addition. Slowly beat in the flour mixture until smooth. Stir in the chocolate chips. Drop by rounded tablespoon onto ungreased cookie sheet (I chilled the dough for an hour first; I always do).
  3. Bake for 8 minutes, and remove from the oven. Push 3 to 4 marshmallows and a few pieces of hershey bar into each cookies. Return to the oven and bake an additional 2-3 minutes until fully cooked. Cool cookies on a wire rack.

Ricotta Ice Cream


I was so intrigued by this recipe that the second I saw it I knew I had to try it. So nevermind the fact that there's a blizzard outside, last night I was making ice cream. This ice cream tastes just like a frozen cannoli! The taste of the ice cream is incredible. The texture on the other hand is a little weird. It was sort of grainy because of the ricotta. I guess that I should throw out a disclaimer that I am very picky about textures. I don't like cottage cheese because it's too lumpy; I don't like pudding because it's too smooth (this is weird, I know). Ross didn't mind the texture at all. In fact, he loved everything about this ice cream.

The ice cream itself is really simple to make. It's basically just combining ricotta, milk, simple syrup, and vanilla extract and then pouring it into the ice cream maker. And I guess as far as ice creams go this one is on the healthier side. There are no eggs or heavy cream.

I decided to just make the ice cream and not the cones, but I think these would actually be very good inside of cones (or cannoli shells!) because the I think the crunchiness of the cones would disguise the grainy texture a little more. If you're looking for a really rich and creamy, decadent ice cream, then this isn't it. But if you want something delicious and different, try this!

Ricotta Ice Cream
Recipe: Giada de Laurentiis, Food Network
Ingredients:
  • 1 (15-ounce) container whole milk ricotta
  • 1 cup whole milk
  • 1 cup simple syrup, recipe follows
  • 1/2 teaspoon vanilla extract
  • 1/2 cup semisweet chocolate chips* (the original recipe calls for 1 cup, but I thought 1/2 was perfect)
Directions:
  1. In a medium bowl, whisk together ricotta cheese and milk until smooth. Add the simple syrup and vanilla extract. Stir to combine.
  2. Pour the ricotta mixture into an ice cream maker and freeze according to the manufacturer's directions. Add the chocolate chips 10 minutes before the end of freezing.

Simple Syrup
  • 1/2 cup water
  • 1 cup sugar

In a saucepan, combine water and sugar over medium heat. Bring to a boil, reduce heat and simmer for 5 minutes, stirring occasionally, until the sugar has dissolved. Take the pan off the heat and allow the syrup to cool.

Cake Pops


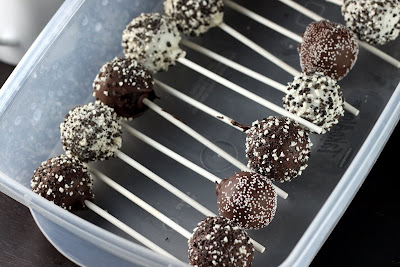
I've been seeing these pop up around the internet for a while now. I've been waiting for a good reason to make them and I finally found one.... a cold, gray Saturday with nothing to do. These were a lot of fun to make (I even got Ross to help with the dipping and sprinkle application and even though he'll never admit it, I think he actually had fun!).


They are a little time consuming so make sure you have enough time or just bake the cake/roll the cake balls the day before. It's really important to make sure your cake balls are chilled really well before you start the dipping process. I was really impressed with how cute these were. What was even more impressive though was how good they tasted! I knew they were going to be adorable but I had very low expectations for how it was actually going to taste since it was boxed cake mix after all... but these were actually really good!

Step by step directions can be found here at Bakerella. I chose to use Devil's Food Cake and Cream Cheese frosting.

(This is the reject pile. A.K.A. the ones that I'm keeping)